


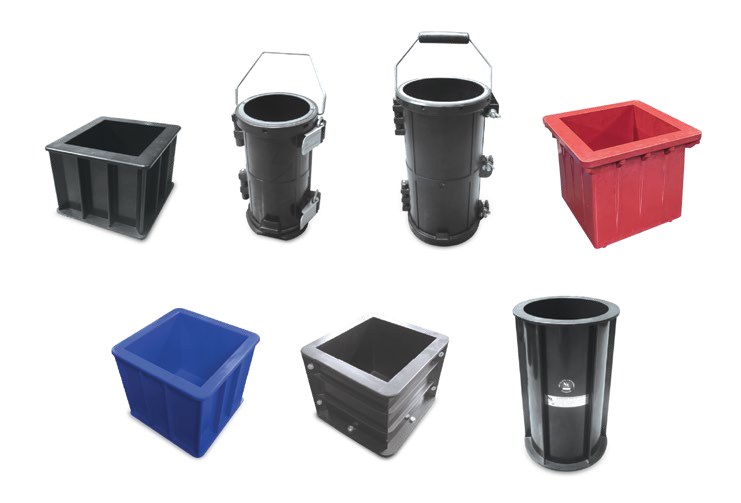
The concrete cube test depends as much on representative sampling, casting and curing as on the final crushing operation. BS EN 12390-2 controls specimen preparation so a 28-day result reflects the sampled concrete rather than avoidable site-laboratory variation.
What the Test Represents
Standard cubes provide a repeatable measure of compressive strength development. They are quality-control specimens, not pieces removed from the structure. Record the batch, sampling time, location, specified class and intended ages. Take fresh concrete in accordance with the sampling plan and remix the composite sample before moulding.
Assess fresh consistency at the same time where required. Our concrete slump test guide explains the field check. Do not add water to the sample or delay casting while other work proceeds.
Moulds and Apparatus
Use verified 150 mm steel or rigid plastic cube moulds conforming to EN 12390-1, assembled tightly on a level base. Clean contact surfaces and apply only a thin release agent that will not pool. Provide a scoop, compacting rod or vibrating table, strike-off tool, labels and protected initial-curing area.
Check mould dimensions, squareness and flatness on a planned schedule. Worn joints cause fins and dimensional error; warped bases create poor bearing faces. A vibrating table should provide controlled compaction without allowing segregation. Keep enough moulds to avoid premature demoulding during high production.
Casting and Compaction
Fill each mould in two or three approximately equal layers. Compact every layer completely, using vibration suited to the concrete or 25 uniformly distributed tamps per layer as the specified manual practice. Penetrate the previous layer enough to remove boundaries without striking the base excessively.
Stop vibration when large air bubbles cease and the surface becomes relatively smooth; prolonged vibration can segregate the mix. Tap mould sides carefully to close rod holes, top up, then strike the surface level. Clean the exterior and attach durable identification immediately. Never rely on loose paper labels that can be separated from specimens.
Prepare a casting sheet for each sampled batch showing mould numbers, sampling time, slump reference, layer count and compaction method. Inspect every 150 mm mould for tight joints and a flat base before concrete arrives. Position the vibrating table on a stable surface and standardise the observable end point so operators do not compact identical mixes differently. Move filled moulds without jolting them, cover immediately and log the initial-curing temperature through the 16–72 hour period. After demoulding, reconcile every cube against the curing-tank register and reserve the correct sets for 7 and 28 days. Dimensional damage or lost identity must be recorded before a specimen reaches the compression machine.
Curing, Demoulding and Transport
Cover cubes to prevent moisture loss and protect them from vibration. Initial curing in the mould is 16–72 hours at 20 ± 5°C. Record actual conditions, particularly on hot sites. Demould without damaging edges, then water-cure at 20 ± 2°C until the specified test age.
Keep the tank clean, circulated where necessary and large enough that specimens are surrounded by water. During transport, prevent drying, impact and temperature extremes, and maintain identification. Dry cubes, poor compaction and late demoulding introduce variation unrelated to the supplied concrete.
Testing and Reporting
Seven-day testing gives an early warning; many conventional mixes reach approximately 65–75% of their 28-day strength, but cement, additions and temperature change that relationship. The 28-day age is normally used for design and acceptance. Early strength must not be converted by a universal factor.
Before crushing, inspect, measure and orient specimens correctly. The loading operation and calculation are covered separately in our concrete compression test method. Report individual results, mean, age, curing history and failure observations. Investigate scatter through sampling, compaction, storage, dimensions and machine records before attributing it to the mix.
Common Errors & How to Avoid Them
- Taking only the first discharge produces an unrepresentative sample; follow the sampling plan and remix the composite portion before casting.
- Pooling release oil in mould corners softens faces and changes dimensions; apply a thin, even film to clean assembled moulds.
- Under-compaction leaves voids and depresses strength, while excessive vibration segregates aggregate; stop when the layer is fully consolidated.
- Uncontrolled site storage dries or overheats young cubes; cover them and maintain 20 ± 5°C during the 16–72 hour mould period.
- Swapping labels after demoulding destroys traceability; use durable identifiers tied to batch, location and test age from casting onward.
- Transporting specimens without moisture protection changes curing condition; cushion and seal them until they reach the tank.
Inspect mould joints and base flatness before a busy pour, not after fins appear. Log tank temperature independently and leave water space around every cube. When results scatter, examine sampling time, layer compaction, demoulding damage and curing records before assuming the delivered concrete was inconsistent.
Frequently Asked Questions
Why are cubes tested at 7 and 28 days?
The 28-day result is normally used for design and acceptance; the 7-day result flags problems early when many mixes have reached about two-thirds of their 28-day strength.
Cube vs cylinder strength?
Cube strength is typically about 20–25% higher because platen confinement differs, but design codes specify conversion and a fixed universal ratio should not be used.
Recommended Apparatus
NL Scientific manufactures the Plastic Moulds for this method. Browse the full Concrete Testing Equipment range or request a quotation from our engineers.
