


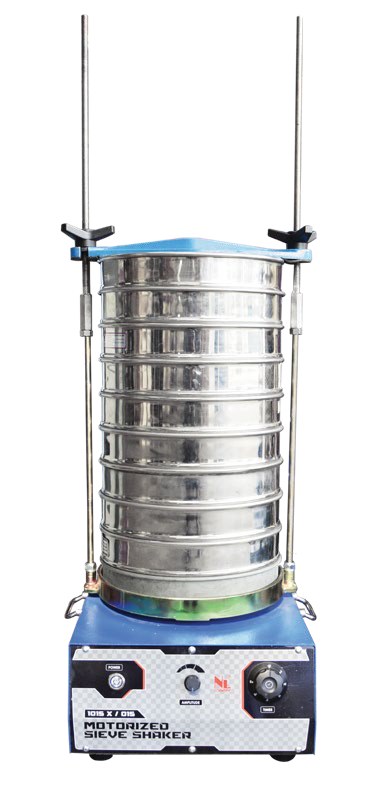
A sieve shaker separates particles through a nested stack of standard sieves using controlled movement. Compared with hand sieving, it delivers more consistent energy, frees operator time and makes the end-point check easier to reproduce.
How a Sieve Shaker Works
The sample is placed on the top, largest-aperture sieve. Motion repeatedly presents particles to apertures; smaller particles pass down until retained by the first mesh they cannot traverse. A lid controls dust and a receiver collects the finest fraction. The retained mass on each sieve is used to calculate grading.
A shaker performs the physical separation described in our aggregate sieve analysis guide. It does not correct an overloaded sieve, damaged mesh or poorly prepared sample, so sample mass and aperture area remain essential method controls.
Main Types
Motorised mechanical machines combine orbital or rotary motion with tapping. Rotap-style action helps angular coarse aggregate reorient and is robust for routine construction laboratories. Floor-standing models accept heavy 300 or 450 mm stacks, while table-top units suit lighter 200 mm sieves.
Electromagnetic shakers use high-frequency, adjustable vibration and suit fine powders, cement and small analytical samples. They offer controlled amplitude and quiet operation but may be less appropriate for large, heavy aggregate. Wet-sieving capability, if required, must be designed into the clamping, drainage and electrical protection.
Capacity and Selection
Start with maximum particle size and required sieve diameter. Common frames are 200, 300 and 450 mm. Larger diameters provide more open area and accommodate a representative coarse sample without mesh overload. Check the permitted stack height, number of sieves, sample mass and total stack weight.
For frequent production testing, choose a continuous-duty drive, positive clamp and programmable timer. A quick clamp saves meaningful time but must distribute pressure without distorting frames. Consider noise, bench loading, dust enclosure, spare parts and whether the timer resumes safely after a power interruption.
Trial the shaker with the heaviest proposed 450 mm stack or the tallest 200 mm stack, whichever governs, and confirm the clamp remains tight for a full cycle. The drive must tolerate the laboratory’s daily aggregate throughput without overheating while its timer repeats the selected 10–15 minute interval. Establish whether the local supply matches motor voltage and frequency and whether the bench can resist transmitted vibration. Order replacement belts, springs, rubber pads and clamp hardware with the unit. Shaker maintenance does not verify sieve apertures, so maintain a separate annual mesh-check programme and identify each frame by serial number.
Operation and End Point
Clean and inspect every sieve, assemble the stack from largest aperture to pan, distribute the dry sample and secure the lid and clamp. Set the method time and run without touching the moving stack. For aggregates, 10–15 minutes is a common starting point under ASTM C136, but adequacy must be verified.
Hand-check the end point: continue sieving for an additional minute and confirm the mass retained on any sieve changes by less than 1%. If it does not, extend the cycle or reduce the sample charge. Weigh every fraction, check mass recovery and investigate spills or material lodged in frames.
Maintenance and Sieve Control
Brush meshes gently from the underside using a tool suited to the wire; forcing particles through changes apertures. Inspect for tears, loose mesh, blocked openings and dented frames before use. Keep a sieve register and verify apertures at least annually, or more often for abrasive workloads. Reference beads, optical checks or an accredited method can be used according to the laboratory procedure.
A typical aggregate grading stack may span 37.5 mm down to 75 µm, but the project envelope determines the actual sizes. Store sieves dry and separated. Record shaker identification, time and settings so another operator can reproduce the separation.
Specification Checklist Before You Buy
- Match 200, 300 or 450 mm sieve diameter to maximum particle size, representative sample mass and available bench area.
- Confirm the maximum stack height, number of frames, combined stack weight and clamp travel with lid and receiver fitted.
- Select tapping plus rotary action for coarse aggregate or adjustable electromagnetic amplitude for powders and fine material.
- State continuous-duty expectations, timer range, noise limit, dust enclosure and whether wet sieving is required.
- Check supply voltage, motor protection, emergency isolation, machine mass and floor or bench load.
- Include certified sieve sets, spare clamps, drive belts or springs, cleaning brushes and local service support.
Require a trial using the laboratory’s heaviest intended stack and verify that nothing loosens or walks during operation. Ask how stroke or amplitude is checked, whether settings are repeatable after power loss, and which maintenance parts are user-replaceable. Sieve aperture calibration remains separate from shaker servicing, so budget an annual verification route for every working mesh.
Frequently Asked Questions
How long should a sieve shaker run?
For aggregates, 10–15 minutes is typical under ASTM C136. Verify the end point by hand-checking that an extra minute changes no retained mass by 1% or more.
What sieve sizes do I need for aggregate grading?
A typical aggregate stack runs from 37.5 mm down to 75 µm, but the specified grading envelope determines the exact sieve sizes.
Recommended Apparatus
NL Scientific manufactures the Motorized Sieves Shaker (E-VERSION) for this work. Browse the full Aggregate & Rock Testing Equipment range or request a quotation from our engineers.
